Showing posts with label nail polish rings. Show all posts

Sunday, 22 May 2011

I wear my Sunglasses at night...

So I can, so I can... watch you weave then breathe your storylines 


Does anyone remember this song from the 80s?
It is one of my favourites so when I found out there is a nail polish with the same name by Catrice, I just had to get my hands on it.

I was so very excited to try it, that I didn't do anything else to it.
And oh boy, was I disappointed!

You see, it's a classic case of nail polish that looks fantastic in the bottle but not so much on the nails.
In the bottle it's a lovely black full of pink and teal glitter.
On the nail, as you can see, it looks plain black, even under the brightest light.


The application and formula were perfect in two coats (plus Seche). I only wish the glitter would show up. Also this colour reminds me of a Japanese nail polish I have which is almost exactly the same. I need to dig it out and do a comparison.

I do apologise for the tipwear. As I was quite disappointed I took these photos 4 days after applying this polish, that's why my nails look like this.


Wanting to give "I wear my Sunglasses at night" one more chance, I decided to try making a nail polish ring.
And yes, it is much better. You can see all the pretty glitter perfectly. This is a nightime photo that I just took but I will update this post with daytime photos asap, so you can see the colour in its full glory.


And I will close this post with my favourite version of the song that shares a name with this polish!


Friday, 22 April 2011

Orly Velvet Rope manicure and ring

Hello everyone ^_^/

while you are reading this, I will be strolling around beautiful Vienna with my darling.
But I queued up a couple of posts so my blog won't be left behind while I travel.

For this post I have chosen to show you a manicure I did a while ago, that goes well with the day I think.
For the base I used two coats of Orly Velvet Rope, one of my favourite purple nail polishes.
Then on the ring finger I put silver spangles and on the index fingers I stamped some flowers using China Glaze Millenuim. Sealed everything with a coat of Seche and the my nails were ready!


I loved how the combination turned out, so I decided to make a matching ring as well.
For those who are interested, I will post a tutorial on how I made this at a later time.
It was very easy and fun ^_^

Friday, 15 April 2011

NfuOh #64 does it get more holo than this?

Hello everyone ^_^/

how are you all enjoying your Friday?
Today I have a fantastic holo to share.
It's the infamous NfuOh 64 and it is one of the most spectacular holographic polishes I have ever seen.

Two coats over NfuOh Aqua Base (which does wonders for the application of holographic nail polishes).


You know that generally I love holographic nail polishes and this is definitely one of my favourites.
It looks fantastic under any lighting and changes so many colours that my nails look like rainbows while wearing it.

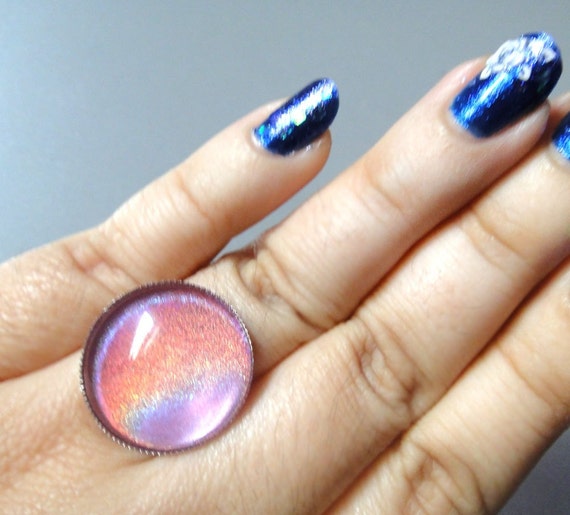
It has been an absolute hit as a ring too ^_^


Also let me remind you of my giveaway, that is ending in a few hours. So now is your last chance to enter!

Wednesday, 6 April 2011

Etsy Greek Street team blog, items of the week

Hello everyone ^_^

how is your week going?
I am very happy today as one of my items is featured in the items of the week over at the Etsy Greek Street Team blog.


The theme is fairy dust and the item is my Holographic Rainbow round adjustable ring.


I am really honoured as it was picked amongst the many creations of all the talented Greek artists.
Please take a look at the blog if you want, it has many interesting posts ^_^

Also on the above photo you can see a preview of my Greek pride manicure which I will show you in my next post ^_^

Thursday, 31 March 2011

Let's make nail polish rings! A tutorial.

Hello everyone ^_^/

today I have a tutorial to share after much demand from friends and fellow bloggers.
Do you remember my post about nail polish rings?


Apparently they proved to be very popular and as a result I got many requests to make my own tutorial on how to make them. There are actually three ways to make them, today I will share the easiest one and in the future I will make tutorials for the other two methods as well.

So let's get started.
First of all here is what you will need.
Nail polishes of your choice
Clear cabochons
Ring base
Glue


Before you do anything else make sure to put some paper on your work bench so you won't stain anything.
I will give you two examples of nail polish design using two nail polishes layered on each other so you can achieve a more interesting look. Of course you can use only one colour as well.

I will show you how to make a crackle nail polish ring and a holographic glitter nail polish ring.

I have chosen to use two of the new China Glaze crackle polishes (in pink and purple), a fuschia glitter and some of my favourite holographic colours. Take each cabochon and paint it either with the crackle polish or with the glitter.


Wait for the colour to dry.
Then take your second colour. I used holographic colours for maximum effect but you can choose anything you like. Apply a couple of layers of the second colour until you get the desired effect. (wait for each coat to dry before applying the next one).


When your cabochons are ready, take an epoxy or a deco glue and the appropriate base for each cabochon, place an amount of glue on the base and place the cabochon.


Wait for it to dry (I usually wait 24 hours to be sure) and your ring is ready to wear ^_^


I hope you liked this tutorial. Depending on the polishes you will use, the possibilities are endless and I think it is very easy to make these. All the things you will need can be found in craft stores or online.

And if you just don't want to make these yourself you can always check my etsy shop  or send me a request to make one for you ^_^

Monday, 7 February 2011

You can have your nail polish and wear it too!

Hello everyone ^_^/

A new week is starting and I thought it was about time to share a new crafting idea since the deco part of my blog must have been feeling a bit left out lately.

But with this post I will combine both deco and nail polish so yay!!!

It all started after coming along this article in one of the nail polish mags I was reading in the summer.
After showing a lovely design with white colours on a purple background the writer suggests making a matching ring using gel. Now I have never played with gel nails but the idea was stuck in my head. I was intrigued. So I started experimenting and investigating.

Then I came across this lovely tutorial on youtube.

That was it, I started experimenting with all sorts of polishes and designs. I find the whole idea very exciting so here are some of my creations as well.

 Various designs. You can see I used glitter, nail decals, swarovski crystals, stamping and sponging.


Rings with the matching manicure.


Rings using Zoya Sara, NfuOh 51 and OPI DS Original.
The possibilities are endless really. You can use a huge variety of materials and methods and produce really unique designs.

These proved to be quite popular as I have already sold quite a few. I even added a few to my etsy shop.

What do you think of this? Exciting? Boring?
If you would like me to do my own tutorial on these rings let me know.

I hope you all have a lovely start to your week!

LinkWithin

Related Posts with Thumbnails