Showing posts with label Sally Hansen. Show all posts

Saturday, 25 May 2013

My recent manis, glitter and holographic nails

Since my posting has become quite sporadic lately I realised I haven't posted my manicures for quite some time. So here are some of my favourite manis of the last few months. Most of them are holographic or glitter nails as expected ^_^

More pictures and details under the cut.

Monday, 31 October 2011

My Pink Halloween manicure

Hello everyone and Happy Halloween!

Today I have a manicure to show you that I was saving especially for today, as it turned out to be my favourite Halloween mani. Wanting to escape the usual colours I decided to use black and magenta instead ^_^

C

The nail polishes I used were Sally Hansen Black Out, Etude House LudiDarling Shimmering Magenta Pink and Kleancolor Chunky Holo Fuchsia. I also used some Pa nail stickers that I got in Japan a while ago.


Please excuse the tip wear. I took the photos on the third day I had this one. Sadly this mani didn't last as much as my other ones, which was a bit disappointing.


Here is a thumb detail. I really liked the black kitties ^_^


Do you like this colour combination for Halloween? What I enjoyed most on this mani was the way the Kleancolor holo looked layered over the other colours. Especially in the sunlight it was fabulous!

I am going to close this post with a photo of my favourite location for Halloween, Roppongi Hills in Tokyo.
This photo was taken on the top of the Mori tower and you can even see Tokyo tower in the back.


Friday, 21 October 2011

Easy nails for Halloween

Hello everyone ^_^/

I have been meaning to make this post earlier in the week but I couldn't find the time, but finally here it is ^_^
I want to show you a couple of very simple Halloween manis, perfect for those who don't have enough time, like me.

The first one is a black and orange polka dot manicure. Very easy to achieve with a dotting tool or a toothpick.


I reversed the colours for an accent finger, to make this a little more fun. I used the orange Claire's nail polish I got from Moni and Sally Hansen's Black Out.


Even though it is a simple manicure, it is quite fun.


For the second one I wanted to use some of the fabulous Halloween polishes from China Glaze. So I started with two coats of It's Alive, a fantastic green glitter.


Then on some nails I drew stitches with black nail polish and on some nails I applied China Glaze Black Mesh. And here is the final result.


What do you think about these? Do you paint your nails in seasonal themes or just go with whatever you like?
I hope I can find time to do a more full on Halloween mani, as I have many ideas in my head. Let's see how that works out XD

For the time being don't forget to enter my running giveaway for a chance to win two Seventeen nail polishes.

Sunday, 26 June 2011

Purple, glitter and duochrome! Yes, please!

Hello everyone ^_^/

It's a lovely Sunday and time for another post too.

Today I will show you the mani I did for my recent trip to London.
I was going through my stash and found a bunch of Sinful Colors polishes that I haven't used, plus I recently randomly discovered Sally Hansen's Garnet Lapis at a local store so I decided to combine all these in a manicure and see what will happen. And this is what I got.


Here are all the nail polishes that I used.


From left to right, Seche Vite top coat, Sinful Colors I Miss You, Daddy's Girl and I Love You, Sally Hansen Garnet Lapis and Color Club Vitabase.

First I painted half of my nails with Daddy's Girl and half with I Love You.


The colours look quite similar in the bottle but on the nails Daddy's Girl is a more blueish purple (it's on my pinky and middle finger).
Then I painted some nails with I Miss You and some with Garnet Lapis. Topped everything with Seche Vite and I was ready to go.


It was very interesting seeing how differently I Miss You looked on Daddy's Girl and I Love You. Garnet Lapis on the other hand looked the same over each colour.

Recently I do not have enough time to do my nails which is why you haven't seen a lot of nail art or stamping from me, but I found that combining different colours and finishes is another way of spicing up a manicure. Also this one lasted almost 10 days with no chipping whatsoever, even when I was dragging my overstuffed suitcase at the airport!

On another note I would like to let you all know that my giveaway is now closed.

Thank you so much to everyone who entered, I am really happy and touched by all your sweet messages *^_^*

I now need to verify and count the entries and then I will announce the winners. Also as during my giveaway, my blog passed the 1000 followers mark, I picked up a couple of special items from London that will be a 1000 follower special prize. The winner of that will be picked from all my current followers and will be announced along with the winners of my giveaway.

Hope you're all having a fab weekend :)

Saturday, 4 December 2010

GOSH Holographic

Hello everyone ^_^/

December is finally here, which means less than a month for Christmas.
And yet here we are having maybe the warmest winter I can ever remember.
20C today, I cannot believe it *rolls eyes*

I am so jealous of all the other European countries where it's snowing, I want the same here aaaaargh!

Oh well, since there is nothing I can do about that, how about some nail swatches of the lovely GOSH Holographic nail polish. I have been reading about this polish for quite some time, yet it was impossible to find at a reasonable price. So when I found a good deal at ebay I didn't think twice.

Last week this pretty polish arrived so here are some swatches.
As I wanted to see it in it's full glory I didn't use any base or top coat, just two coats of the polish.


After wearing it for four days I wanted to change my manicure but before that I decided to try some of my Sally Hansen and Essence nail art pens on it to see how they would look. So I doodled on my nails a bit. Darling found it very funny and is still teasing me about it XD


I have to say GOSH holographic really lived up to my expectations. It is a super shiny holographic polish, it looked perfect with two coats and for the four days I was wearing it, it lasted great. Plus it looks even better when I doodle on it. That's definitely a plus!

*edit* to remind you of my 400 followers giveaway that is ending on December 10. There will be two winners, so if you haven't entered already, now is your chance ;)

Friday, 22 October 2010

Duochrome Holographic Nails

Hello everyone ^_^/

wow, it's almost the weekend already. Another week just flew by.
My plan was to post this on Tuesday but I guess that didn't work out as planned.

Here is a duochrome holographic mani with Glitter Gal's purple holographic and Sally Hansen's prisms in a pink unidentified colour, both sent to me by the lovely 'Chelle in our recent swap ^_^


Both colours are two coats with a layer of Seche on top. See how shiny and colourful my nails are?

And here are the individual colours with the polishes for reference.


I am absolutely loving both of these colours. I think I am going through a major holo phase and I just can't stop staring at my nails. I am still wearing this mani and almost a week later it still looks fantastic (and getting a lot of compliments).

Sunday, 11 July 2010

Purple Animal Print Nail tutorial

Hello everyone ^_^/

It is the weekend and I have more free time in my hands so I am thinking it is time for another tutorial.

Here is one of my favourite patterns, animal print, combined with one of my favourite colours, purple.


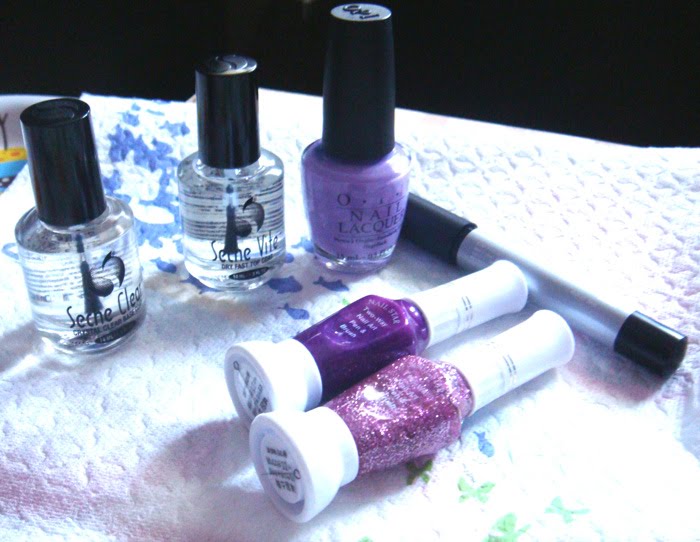
First here is what you are going to need.
A lilac nail polish (I used OPI's Do you Lilac It), base and top coat (I used Seche Vite for both), a silver nail art pen (I used Sally Hansen's silver nail art pen), a deep purple and a purple glitter nail art polishes.


So after preparing your nails you apply a layer of base coat.
Then two coats of the lilac polish.


I really love glitter so usually I like covering one or two of my nails on each hand with glitter. In this case I chose my index finger and my little finger. After applying a layer of the purple glitter polish on each, using the pen side of the dark purple nail art polish I drew large dots on each of my other fingers.


After waiting for the dots to dry for a few minutes, using the nail art pen I drew smaller dots inside the big ones.

And voila, animal print nails.


I hope you enjoyed this little tutorial, I will make another one soon.

Until the next post, take care everyone :)

LinkWithin

Related Posts with Thumbnails