One of the latest nail art trends is the shattered glass look, which looks fabulous and is very easy to achieve. Wanna know how to do it? Just read on for a step by step guide.
Showing posts with label OPI. Show all posts
Saturday, 5 March 2016
Thursday, 11 February 2016
Tuesday, 24 December 2013
Thursday, 8 November 2012
No H8, eradicate hate in the nail polish blogging community
Hello everyone ^_^/
today I have a post that is a bit different, to share with you. We all know that at times in every community drama and wank can arise. And even worse, bullying. Sadly this has been the case in the nail blogging world recently and although I usually stay away from such situations, today I want to join the NO H8 in the Nail Polish Blogger community movement with all the fellow nail polish bloggers who are taking a stand against hate and bullying in the nail polish blogging world (and in the world in general). Today, on November 8th, nail bloggers are taking a stand against bullying and are sharing a purple manicure.
Bullying is not funny. It is not cool. It is not right. And more importantly, it is not okay.
Most of us are, thankfully, residents of countries that support tolerance and many of our families have settled in these places simply for that reason. Generations later, it is our responsibility to perpetuate that message of tolerance across our new social platforms, including the internet.
As members of the nail polish blogging community, we all share a love of beauty, colour, and lacquer. Other than that, we are remarkably different: from our race to our religion to our hair colour...even to our polish application techniques. To marginalize anyone because of those differences is completely unacceptable and today I take a stand against that. I refuse to allow other people's view of "normal" dictate how I behave, believe, and blog.
In solidarity with a multitude of bloggers linked below, my purple manicure represents my proud commitment to the No H8 movement. Today, November 8, I dedicate my post to ending bullying of any kind and to encouraging diversity and imperfection among our colourful community.
List of the sites and bloggers who support NO H8
Wednesday, 14 March 2012
Swapping with friends is always fun!
Hello everyone ^_^/
You know that happy feeling when you get a package in the post. It is very exciting when it is nail mail. But what makes it even more special is when the package is from a dear friend. During the last couple of months I received packages from two very special friends of mine so today I want to show you what was inside ^_^
Wednesday, 9 March 2011
Riva mani followup and a Swarovski ring
Hello everyone ^_^/
how are you today? I am warming up by the fireplace, while writing this post.
Remember my Chanel Riva manicure from the previous post? After having it on for a couple of days I decided I wanted to spice it up a bit. So I whipped out my Konad stamping plates, OPI DS Extravagance and Essence Clyde and this is what I came up with.
Do you see the ring I am wearing in the first photo? It was gifted to me by Chunky Bling, my new affiliate. It is a lovely ring with clear Swarovski crystals.
I usually prefer wearing huge rings, but this sparkly beauty is hard to pass by. I love wearing it in sunny weather because the Swarovski crystals are so shiny. And it goes great with all my manicures too ^_^
If you would like to check out their whole Swarovski jewellery collection, you can check the Chunky Bling website.
how are you today? I am warming up by the fireplace, while writing this post.
Remember my Chanel Riva manicure from the previous post? After having it on for a couple of days I decided I wanted to spice it up a bit. So I whipped out my Konad stamping plates, OPI DS Extravagance and Essence Clyde and this is what I came up with.
I really like the end result, especially how Clyde looks layered over Riva. And I am surprised at the excellent stamping abilities of DS Extravagance, that was something I wasn't really expecting! I sealed everything with a coat of Seche Vite top coat and my mani is still as good as new ^_^
I usually prefer wearing huge rings, but this sparkly beauty is hard to pass by. I love wearing it in sunny weather because the Swarovski crystals are so shiny. And it goes great with all my manicures too ^_^
If you would like to check out their whole Swarovski jewellery collection, you can check the Chunky Bling website.
Monday, 18 October 2010
the Greek files #1
Hello everyone ^_^/
I hope you all had a good start of the week.
Today is a day of new beginnings for some people very dear to me and I wish them all the best with all my heart.
So I will start a new feature in this blog too.
The Greek files. Through this feature I will present to you nail polishes that are available in Greece and I haven't seen a lot in other blogs. They might be Greek brands or other brands that I have discovered while browsing various stores around here.
So for the first instalment I will present to you a couple of lilacs (Adamo 86 and Erre Due 228) and compare them to other brands to see the difference. These are the polishes I am going to compare.
From left to right we have Eyeko lilac, Etude House PP901, Erre Due 228, Adamo 86 and OPI Do you Lilac It?
As my hand is still injured I used a nail wheel for the comparison. All the polishes are two coats without top coat under natural light and are applied in the same order as the bottles.
The colours look very similar in the bottles but they are completely different when applied on the nail wheel.
Eyeko, Etude House and Erre Due look quite similar, Adamo is more to the grey side while OPI is the more intense one.
What do you think of these polishes?
I hope you enjoyed this new feature :)
Tuesday, 27 July 2010
Zoya snowsicle and a gradation tutorial
Hello everyone ^_^/
It is a lovely cool summer morning and I am finally feeling better, yay!
Thank you so much to everyone for your get well wishes and also to everyone who has entered my giveaway. If you haven't entered yet, it is open until August 10 so there is plenty of time.
Today I want to share a purple gradation nail tutorial that I did a few weeks ago.
I did it using Zoya Snowsicle as my base. I really like this colour because even though it's sheer it is very sparkly and pretty. In the photo I am wearing two coats without top coat. Pretty nice, isn't it?

Here is what you are going to need for this tutorial.

Base coat and top coat, a fairly light colour as your gradation base (I used Zoya Snowsicle), and two purple colours, one lighter and one darker (I used OPI's Do You Lilac It and Purple With A Purpose), a purple glitter (I used BarryM's Lavender Hexograms) and a piece of a make up sponge.
After applying base coat and two layers of the gradation base colour, it is time to use the sponge. Drop a bit of the ligther colour on a piece of paper and then dab the sponge in it. Gently press the sponge on the top 2/3 parts of your nail until it is covered with the colour. Then take the darker colour, do the same and this time cover the top 1/3 of your nail. To add extra sparkle apply a layer of the glitter polish.
Then top coat and you are done ^_^

I had a lot of fun doing this and it was actually my first time trying the sponging effect. I have seen quite a few tutorials both online and on magazines and I have to admit it was easier than I thought.
I hope you enjoyed this tutorial.
Have a lovely day everyone :)
Sunday, 11 July 2010
Purple Animal Print Nail tutorial
Hello everyone ^_^/
It is the weekend and I have more free time in my hands so I am thinking it is time for another tutorial.
Here is one of my favourite patterns, animal print, combined with one of my favourite colours, purple.

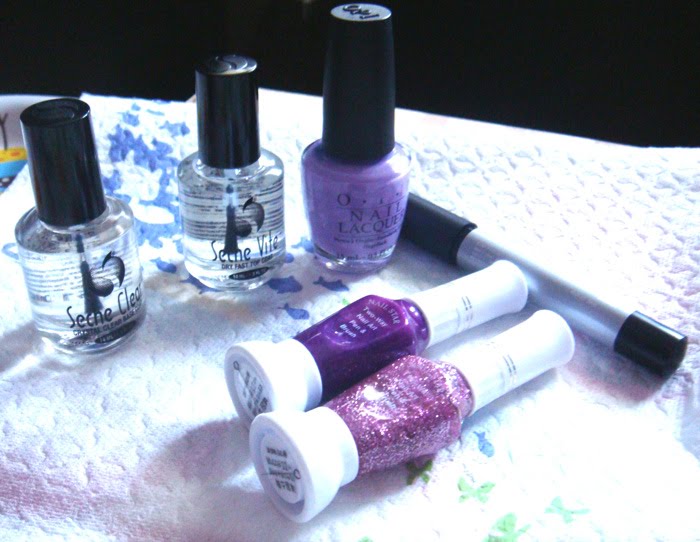
First here is what you are going to need.
A lilac nail polish (I used OPI's Do you Lilac It), base and top coat (I used Seche Vite for both), a silver nail art pen (I used Sally Hansen's silver nail art pen), a deep purple and a purple glitter nail art polishes.

So after preparing your nails you apply a layer of base coat.
Then two coats of the lilac polish.

I really love glitter so usually I like covering one or two of my nails on each hand with glitter. In this case I chose my index finger and my little finger. After applying a layer of the purple glitter polish on each, using the pen side of the dark purple nail art polish I drew large dots on each of my other fingers.

After waiting for the dots to dry for a few minutes, using the nail art pen I drew smaller dots inside the big ones.
And voila, animal print nails.

I hope you enjoyed this little tutorial, I will make another one soon.
Until the next post, take care everyone :)
Sunday, 4 July 2010
Of nails and birthdays
Hello everyone ^_^/
Happy 4th of July to all Americans and Canadians.
July 4th is special for me too but for another reason.
Two of my favourite artists share a birthday on July 4th.
So I am gonna share one video of each to celebrate.
The first is Gackt, one of the most talented and magical musicians I've ever heard.
He is having a European tour this month and I can't wait to enjoy his live performance once again.
This is one of my favourite songs from him, 雪月花 - The end of silence.
The second is Akanishi Jin, a totally hilarious and sometimes sexy and fun guy from a popular JE band, KAT-TUN. Jin sometimes likes to think he is Justin Timberlake but I guess that's part of his charm too XD
This is a collaboration he did with Jpop artist Crystal Kay, a lovely song called Wonder.
And as I don't want to divert from the main purpose of this blog, here are some swatches of one of my favourite polishes, OPI's Do you Lilac It.
I am gonna turn this into an animal print mani which I am gonna post later on but for now here is the lovely light purple colour, two coats without top coat.

Wednesday, 2 June 2010
Polka Dots
Hello everyone ^_^/
As summer is finally upon us, I am in a cheeky mood and getting more and more into polka dots.
I've been trying all sorts of different polka dot designs so I decided to share some of my results.
Right now I have a black x silver polka dot design on my nails and this is how I did it.
I used the following products.

Black "Goth" polish and the silver from the foil series by Orly, China Glaze base and top coats, a dot brush and for the finish OPI fast dry spray (I am saved by this product because usually I keep ruining my manicures by randomly touching my nails here and there).
After applying the base coat I painted my nails to look like this.

Waited for them to dry a bit and then using the dot brush I did the polka dots(if you don't have one, a toothpick will produce the same effect ^_^).
Waited a bit for the dots to dry too and then applied top coat and used the spray too. This is the final result.

I also did the same design on my friend's nails, using pastel colours (mint and pink) by H&M and Anna Sui and this is how it came out.

So the design works well with all sorts of colour combinations and it is very simple to do as well.
Next week I am gonna try more styles so stay tuned ^_^
Subscribe to:
Posts (Atom)